When you know how to make birdseed ornaments, you make the birds in your area happy and add decorative trinkets to your garden. Birdseed ornaments DIY is also a fun and easy project to entertain the kids while you cook the holiday dinner. These bird cookies are ideal for the coming cold seasons since it is the time when birds have a shortage of food in the wild. Get your pen and notebook ready! Read on.
Table of Contents
2 Easy Ways to Make Birdseed Ornaments
Making bird seed ornaments can take around 15 to 30 minutes to finish. If you have a bird feeder at home or are feeding wild birds regularly, you might already have everyone you need to get this project started. Otherwise, you can head to your local bird store and easily purchase all the missing items. Let’s begin by gathering all the supplies and proceed with the step-by-step tutorial.
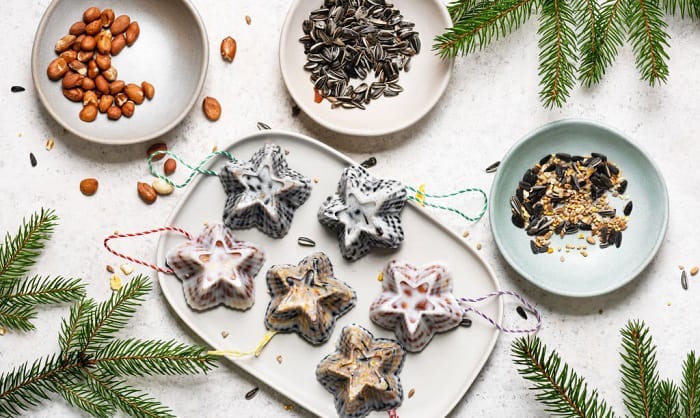
Birdseed Ornaments Recipe with Gelatin
This is one of the most popular recipes, using gelatin. It is sure to attract many birds to your yard while making the space more lively and beautiful. You can also make these to give to your bird watcher or nature-loving friend or relative.
What to prepare
- 1 packet of unflavored gelatin
- ¾ to 1 cup of birdseed
- ¼ cup boiling water
- Twine or ribbon
- Waxed or parchment paper
- Cookie cutters
Step 1: Mix gelatin and water
In a small pan, combine the water and gelatin. Bring it to a gentle boil while stirring continuously until completely dissolved. Remove from the stove and cool down for a minute.
Step 2: Add bird seeds
Mix the birdseed. Add a few extra as needed but not more than a cup, only until all the liquid is absorbed. Otherwise, the feed will break with the lack of adhesive.
With waxed paper or parchment on a baking tray, arrange the cookie cutters on top. Add the mixture halfway, lay a twine down the length of the cutter, and fill it to the top.
Step 4: Let it dry
Make sure to compress the mixture firmly. Dry for two hours or overnight. Once dried, press the ornament out of the cutters.
Step 5: Add ribbon and hang
This is optional, but you can tie a decorative ribbon making it more attractive. Find a suitable location like a tree branch to hang the birdseed ornament.
The measurements can yield three to four ornaments using standard-sized cookie cutters. Doing big batches is not recommended as the mixture can dry out while shaping the ornaments.
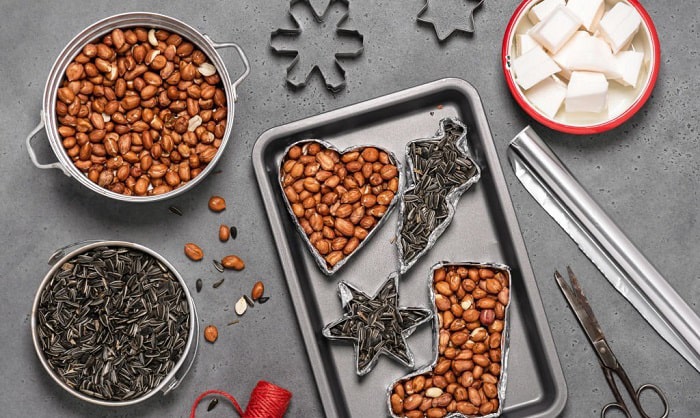
Birdseed Ornaments Recipe without Gelatin
The common problem that many experience with birdseed ornaments with gelatin is that they melt under the sun. If you live in areas with warm weather all year round, you might want to opt for a recipe without gelatin.
What to prepare
- ½ cup water
- 2 teaspoon Agar Agar powder
- 2 cups birdseed
- Hemp twine
- Parchment paper
- Cookie-cutter
- Cookie sheet
- Whisk
- Spoon or spatula
Step 1: Dissolve the powder in cold water
In a pot, combine cold water and agar powder. Stir with a whisk to dissolve the powder before tuning the stove to medium, bringing the solution to a boil. Simmer for two minutes.
Step 2: Add the birdseed mix and stir
Once the mixture is thick, turn off the stove. Add the birdseed mix and stir until everything is coated with the solution.
Place the cookie cutters on the cookie sheet lined with parchment paper. Scoop the mixture using a spoon and fill the cutters to half full.
Step 4: Attach the twine halfway
Loop the twine and place it in the middle of the cutter before filling it with the mixture all the way. Cover with parchment paper, then pat down firmly with your hands.
Step 5: Let the mixture set and dry
Allow the ornament to set and completely dry for two to three hours. Keep it on the cookie sheet without moving it elsewhere.
Step 6: Press out, cool, and hang
Gently press it out of the cutter. Continue drying on a cooling rack for a day. After the long wait, your ornament is now ready for the wild birds. Find an ideal location outside where you can hang it.
There are many recipes for healthy bird seed ornaments. You can mix and match the ingredients to create several varieties that outdoor birds in your area will surely love. However, you should avoid adding some food to keep them in top health. This includes the following:
- Corn syrup
- Dried coconut
- Bread
- Milk
- Salty foods
- Honey
- Sugary foods
- Raw meats except for fatty suet
- Expired or spoiled birdseed, and
- Fruits treated with pesticides
Take note of this list in order to make birdseed ornaments safe for birds.
Helpful Birdseed Ornaments Tips
The birdseed ornament recipes are easy to follow, but you will sometimes encounter a small hurdle. In this section, we will address some of them and give advice on how to better deal with the situation by avoiding them before it happens.
- Cookie cutters with minimal details and clean lines work best.
- Make small batches at a time.
- Choose bird seed mix with more millet than black oil sunflower seeds since the latter is often challenging to press into the corners of the shape cutters.
- Hand the birdseed ornaments on a broadleaved tree or shrub. This will give the birds enough branches to cling to and leaves to cover.
- Store the birdseed ornament in a zip-lock bag or airtight container and place it in a dry and cool place. This will keep it away from heat and moisture and extend the shelf life of the seeds from four to six months.
- If dealing with the sticky mixture annoys you, grease your fingers with cooking spray or coconut oil.
- Don’t keep the mixture in the fridge for too long after adding the gelatin to the birdseed, as it might break. When this happens while you are stirring, melt it in the microwave and try again.
- Are you struggling with seeds sticking to the utensil while stirring the mixture? Coat the spatula or scraper with nonstick spray.
Conclusion
After reading how to make birdseed ornaments and memorizing the recipes by heart or listing them down, you are ready to get rolling. Time to scour the kitchen for the ingredients or head to the store to get some products you don’t have. Gather the kids together to make homemade bird seed ornaments.
We hope that all the information in this article was able to help you and answer the questions you have in mind. If you have already tried the recipe, tell us about your experience. Do you have tips to share? Comment them below because we love hearing from you!

George and I became friends after a birdwatching trip with our new group. And we have been enjoying every adventure together. When he told me the idea of establishing a site that shares our experiences and fun, I immediately agreed. After trials and errors, here we have Thayerbirding.